0

Oreo cupcakes

oreo-cupcakeRecently, I’ve been baking a weekly batch of cupcakes to share with a charity I’m volunteering at. Every Friday we sit down together to enjoy a home-cooked lunch, finished off with a freshly baked cupcake. This week, I arrived with a batch of Oreo cupcakes – a chocolate sponge, topped with a mound of sweet Oreo buttercream and a whole Oreo cookie, plus there’s a sneaky Oreo surprise in the bottom too! I’d underestimated quite how popular this little cookie is, and before long the cakes were mere crumbs on a serving plate…

You will need

(for the cupcakes)
175g Stork
175g caster sugar
3 large eggs (beaten)
175g self raising flour
1tsp baking powder
60g cocoa powder
1tbsp golden syrup
12 Oreos

(for the buttercream/decoration)
250g unsalted butter
250g icing sugar
1 packet Oreos
12 whole Oreos

Method
Preheat the oven to 180C and line a 12-hole cupcake tin with cake cases. Place a whole Oreo in the bottom of each case.

Cream together the Stork and caster sugar until creamy and paler in colour. Mix in a little of the beaten eggs, then a little of the flour (mixed with the baking powder), and repeat until all of the flour and eggs are added. Mix the cocoa powder with enough hot water to make a thick paste, and add it to the batter with the golden syrup. Mix until fully combined. Spoon the mixture into the cake cases – I prefer to use an ice-cream scoop to ensure uniformity – and bake for 25-30mins, or until they are springy to touch and a inserted skewer comes out clean.

While the cupcakes are cooling, make the buttercream. Cube the butter and beat until it is creamy and a lot whiter in colour. Add the icing sugar a little at a time and beat until fully combined. In a food processor, blitz a packet of Oreos into fine crumbs, then add these to the butter and icing sugar mixture. Mix well to make Oreo buttercream.

When the cupcakes have cooled, heap a mound of Oreo buttercream on top of each cupcake using an ice-cream scoop. Finish with a whole Oreo for decoration

6

Rocky Road cookies

Yrocky-road-cookies
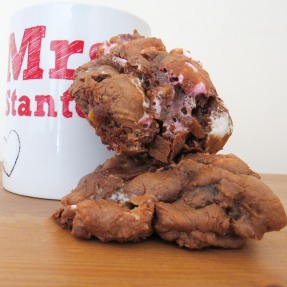
ou know when you fancy a sweet treat, but don’t feel like changing out of your pyjamas and walking to the shop? You have an array of random ingredients in the cupboard left over for previous baking sessions, and decide to throw them all together to make something epic – a truly indulgent snack! These cookies are the embodiment of that – marshmallows, glace cherries and fudge pieces, mixed into a basic chocolate cookie dough – they can be adapted to whatever’s in the cupboard, and definitely satisfy that sweet craving!

You will need
200g dark chocolate
50g butter/margarine
397g tin of condensed milk
225g self raising flour
a tub of glace cherries
a bag of mini marshmallows
a bag of fudge pieces

Method
Preheat the oven to 180C and grease two large baking trays. Melt the chocolate and butter together in the microwave, stirring at 30 second intervals. Stir in the condensed milk, then gradually mix in the flour. Once combined, add the cherries, marshmallows and fudge pieces. Heap messy spoonfuls of the mixture onto the baking trays, and bake in the oven for approximately 12 minutes, or until the cookies are beginning to harden on top. Remove from the trays and leave to cool on a wire-rack. Enjoy with a cup of tea, or a mug of hot chocolate.

0

Mr Stanton’s cookies//Guest post

mr-stanton-ginger-nutmeg-cookies
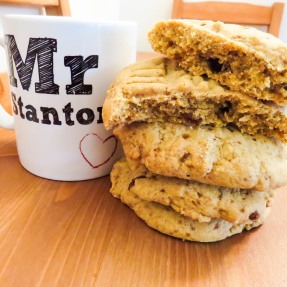
Making sweet things never came naturally to me. In Food Tech, aged 15, I attempted – what I didn’t think was that ambitious for my first project – strawberry marzipan. It came out as a pink gloop, more like ice-cream left out in the sun. I’ve had a couple more baking disasters, including a very well-done cake (Chocolate and Charcoal). If sweet stuff is created, it is Mrs Stanton that does it. However, I was compelled to try and bake her something, so I Googled ‘Easy Cookie Recipe’ for inspiration, and this time it didn’t just work, they were good!

You will need
225g butter (softened)
110g light brown sugar
275g plain flour
1tsp cinnamon
1tsp nutmeg
1tsp ginger

Method
Preheat the oven to 170C, and lightly grease a large baking tray. Cream the butter and sugar together until well combined, creamy and fluffy. Add the flour and spices and bring the mixture together to form a dough. Break the mixture into balls that are slightly bigger than a two-pound coin, and place them on the prepared tray, pushing them flat with a fork. Bake for 15mins, or until they are golden brown and firm to touch. Cool on a wire-rack and enjoy with a cup of tea.

0

Tiramisu

homemade-tiramisu

Tiramisu is my Mum’s favourite dessert. Whenever she sees it on the menu she cannot resist ordering it. On alternate weekends I visit my parents for dinner, and where possible I try to take along a sweet treat. Tiramisu was a challenge for me – not because it is particularly difficult, but because I know how many delicious versions of the dessert Mum has tasted, giving me a high standard to live up to – thankfully mine was declared ‘better than in the restaurant’. Here is my recipe…

You will needPSX_20150424_110725
600ml double cream
250g mascarpone
75ml Marsala wine
5tbsp golden caster sugar
600ml strong coffee
350g sponge fingers
50g dark chocolate
8in loose bottomed square tin

Method
Whisk together the cream, mascarpone, Marsala and sugar until thick and well-combined, then leave to one side. In a separate bowl, make 600ml of strong coffee. One by one, soak the sponge fingers in the coffee and use to line the base of the square tin. Spread a layer of the cream mixture over the coffee-soaked sponge fingers until fully covered, the cover with a layer of grated chocolate. Repeat the process, layering sponge fingers, cream and grated chocolate until all components have been used up – I found the mixture made three layers of each component in an 8in square tin. Leave in the fridge for at least two hours for the dessert to firm up and the flavours to fully soak in. Remove from the tin and slice into portions to serve.

0

Sweet potato and squash soup

low-calorie-sweet-potato-and-squash-soup

The Stanton household is often full of cake. Baking is my hobby, and I love to do it as often as possible. Friends and family get a share of whatever I make, if I am due to see them, but most of the time it is Mr Stanton and I that polish off whatever sweet treats I produce – such a chore! Sometimes I crave something a little healthier, and this recipe for a spicy, hearty squash soup is a surefire hit for when indulgent foods just won’t do. At just 200 calories a bowl, and with six servings per batch, it is a guilt-free treat…

You will need
200g butternut squash
170g parsnips
170g carrots
650g sweet potato
130g red onions
3 cloves garlic
1tsp paprika
1tbsp curry powder
1tsp sugar
2tbsp olive oil
1litre vegetable stock
2tbsp milk
seasoning to taste

Method
In a large pan, cook the chopped onions and garlic in half the oil until soft. Chop the butternut squash, sweet potatoes, parsnips and carrots into rough chunks, and add to the softened onion and garlic mix. Mix in the rest of the oil, and the paprika, curry powder, sugar and seasoning and cook for ten minutes, stirring frequently. Pour the stock over the vegetables and bring to the boil, then turn down the heat and cover. When the vegetables have softened, add the milk and cook for a further five minutes. Pour the mixture into a blender, and blend until the soup is thick and smooth, then return to the heat to warm through. Serve with bread, or some wholemeal pitta.

0

Roasted vegetable couscous salad

roasted-vegetable-couscous-salad-with-halloumi

My husband Mr Stanton is a vegetarian, which means our meals at home are always meat-free. As a lifelong meat-eater, it took me a long time to get excited about vegetarian food as many of the meat substitutes on offer are simply a poor imitation of the real thing. For me, the secret to a good vegetarian meal is to avoid meat substitutes and focus on the veg! This simple salad is full of colour and flavour. It’s a delicious meal for a summer evening or even to entertain friends…

You will need (for three servings)
one small butternut squash (cubed)
two peppers
three red onions
a punnet of cherry tomatoes
eight cloves of garlic
fresh basil
olive oil
balsamic vinegar
halloumi
wholewheat couscous

Method
Preheat the oven to 200C. Put the cubed butternut squash in a roasting dish with half of the cherry tomatoes, four cloves of garlic and the peppers and two of the red onions cut into large chunks. Drizzle with a liberal glug of olive oil and roast in the middle of the oven for one hour.

For the salsa, finely chop the basil, and the rest of the garlic, cherry tomatoes and red onion and place in a bowl with some olive oil and a dash of balsamic vinegar. Mix together and leave in the fridge until ready to serve.

Ten minutes before the vegetables have finished roasting, prepare the couscous according to the instructions on the packet and leave to one side. Cut the halloumi into slices and fry in a little olive oil, turning occasionally, until it is golden brown on both sides.

Stir the roasted vegetables into the couscous and spoon onto serving plates. Top with the golden halloumi and a generous serving of salsa.

2

Chocolate orange biscuits

chocolate-orange-biscuits-rgbI like to bake something every week, which means I often need to find quick, simple bakes that I can fit into evenings once I get back from work, or squeeze into a weekend morning before I’m off doing errands or having adventures. Since creating my recipe for ginger snaps a month ago, I’ve been experimenting with different combinations of flavours to make batches of biscuits, which can be stored and saved for those days when a sneaky sweet treat is required. These chocolate and orange biscuits are my latest concoction…

Ingredients
125g self raising flour
50g butter or margarine
1tsp bicarbonate of soda
2tbsp caster sugar
75g golden syrup
100g dark chocolate (grated)
zest and juice of one small orange

Method
Preheat the oven to 180C and grease a large baking tray. Mix the flour, caster sugar and bicarbonate of soda together in a large bowl. Add in the grated chocolate and orange zest and put to one side. Put the butter, golden syrup and orange juice in a separate, microwave-safe bowl, and microwave for 60 seconds, or until the butter is melted, making sure to stir every 20 seconds or so. Mix the liquid mixture into the dry ingredients and combine to form a soft sticky dough. Using your fingertips, pull of a small piece of the dough and roll into a ball using the palms of your hands, then place the ball onto the prepared baking tray and flatten slightly with the tip of your finger. Repeat the process until all of the dough has been used. Bake the biscuits for 15mins in the preheated oven, then leave to cool on the baking tray. Once, hardened and cooled, remove the biscuits using a palette knife and store in an airtight container.

2

Mini chocolate fudge cupcakes

chocolate-fudge-cupcakes-rgb

When visiting friends, or baking for guests I like to offer an array of miniature cupcakes. Something bitesize, but super rich and wonderfully sweet, it’s the perfect snack to pick up and enjoy with a cup of tea or coffee, or as part of a wider spread of food. Often, for people with less of sweet-tooth than myself, a large cupcake can be too sweet, whereas the miniature version is much more manageable, with even fans of savoury bakes tempted to come back for more than one…

Ingredients
for twelve miniature cupcakes
55g dark brown muscovado sugar
55g butter or margarine
1 large egg (beaten)
55g self raising flour
1/4tsp baking powder
20g cocoa powder
1tbsp milk
1tsp black treacle

To decorate
100g butter or margarine
150g icing sugar
50g cocoa powder
fudge chunks
chocolate covered popping candy (optional)

Method
Preheat the oven to 180C and line a miniature cupcake tin with twelve miniature cupcake cases. Cream together the butter and sugar, then slowly mix in the beaten egg. Add the flour, baking powder, cocoa powder, treacle and milk, and mix until well combined. Spoon the mixture into the prepared tin – a heaped teaspoon per case should do the trick – and bake for 15-20mins, until the tops of the cakes spring back when touched and an inserted skewer comes out clean.

While the cakes are cooling, make the buttercream by combining the butter, icing sugar and cocoa powder. Unlike cake mixture which can lose air and spoil if it is over-mixed, buttercream will improve the more is it mixed – for a thick, creamy buttercream, combine the ingredients and continue to whisk for around five minutes.

Spoon the buttercream into a piping bag and pipe a swirl onto the top of each (cooled) cupcake – I used a disposable piping bag with a Wilton 1M open star nozzle. Finally sprinkle the chunks of fudge and popping candy over the top of the cupcakes.

0

Rocky Road

rocky-road-rgbI have always been a huge fan of rocky road. There are three reasons why it is one of my favourite things to make and eat… One, it contains all of my favourite ingredients, sticky glace cherries, soft marshmallows, crunchy biscuit, and bitter dark chocolate. Two, it is a recipe that is so easy to vary up – take out the marshmallows if making for a veggie, swap in some nuts or chunks of fudge. Three, it is so easy to make, with no actual baking required. So here it is, the recipe for rocky road, just the way I like it…

Ingredientsrocky-road-ingredients-rgb
a large bar of dark chocolate
3tbsp golden syrup
140g margarine
a bag of mini marshmallows
200g digestive biscuits
a tub of glace cherries

Method
Place the biscuits in a large mixing bowl and bash with the end of a wooden rolling pin (or similar tool) until they are ground into small pieces. Tip in the marshmallows and glace cherries and mix together. Break up the chocolate and put it in a separate, microwave-safe bowl, along with the butter and golden syrup. Melt in the microwave, stirring every 30 seconds or so, so that the mixture doesn’t burn. Once the chocolate, butter, and syrup mixture is melted, pour it over the dry ingredients and mix together. Tip the combined mixture into a shallow tin lined with greaseproof paper, and leave in the fridge to set. Once the mixture has hardened, turn out onto a chopping board and cut into squares.


0

Halloween spider cupcakes

halloween-spider-cupcake-rgb

I’m not much of a Halloween fan, as I am a huge wimp when it comes to anything scary or creepy-crawly that can make me jump. I do however love having the excuse to make something themed when a seasonal holiday comes along. This year, I chose spiders. They are one of the things that terrify me most, so I thought it apt that I harness their spookiness for a Halloween-themed cupcake. Though I’ll admit, this spider is far cuter than any of the monsters that appear in my flat…

You will need
cupcakes baked in Halloween cases (I chose chocolate as they are dark in colour)
orange-coloured buttercream
chocolate covered popping candy (optional)
black sugarpaste
white sugarpaste
edible glue
sugarpaste tools

Method
Pipe a swirl of buttercream on the top of each cupcake and sprinkle with some chocolate covered popping candy – this is a lovely surprise for anyone eating the cupcake, as it gives a spooky tingle. Roll out the black sugarpaste and cut four thin strips, about 7cm in length and 3mm in width. Lay the strips across the top of the buttercream so they are touching in the centre, but fanned out over the top of the cake – these are the spider’s legs. Next roll some black sugarpaste into a ball about 2.5-3cm in diameter. Stick this on top of the legs using some edible glue, and push a smile into the centre using a curved sugarpaste tool. Finally roll two small balls of white sugarpaste and glue them on top of the body, then roll two smaller balls of black sugarpaste and glue them to the front of the white balls – these are the spider’s eyes. Repeat the process for all the cupcakes, until there’s a spider army ready to tackle Halloween and entertain any trick-or-treaters or party guests.